Have you ever looked at a shirt and thought, “I wish this was a tank top”? You’re not alone! Cutting shirts into tank tops has become a popular trend in DIY fashion. In this article, we’ll give you a simple, easy-to-follow guide on transforming your shirt into a tank top.
Before we start, let’s discuss the types of shirts best for this project. Generally, shirts made from cotton or cotton blends are the easiest to work with. Avoid using shirts made from delicate or stretchy fabrics, as they can be more difficult to cut and may not hold their shape well.
Now, let’s dive into cutting a shirt into a tank top. Don’t worry; we’ll provide detailed instructions and pictures to make the process easy to follow. By the end of this article, you’ll have a trendy new tank top to add to your wardrobe! So, let’s get started!
Contents
Selecting the Right T-Shirt
The first step in cutting a shirt into a tank top is choosing the right shirt. You’ll want to select a shirt with the right characteristics for this project and also pick the particular one from a wide list of different types of tank tops to design.
Key Takeaway
The best shirts for this project are cotton or cotton blends. These fabrics are easy to work with and hold their shape well. Look for shirts that fit well and are tight enough.
On the other hand, it’s best to avoid shirts made from delicate or stretchy fabrics. These fabrics can be more difficult to cut and may need to hold their shape better after cutting. Additionally, shirts with graphics or patterns may be more difficult to work with, especially if you want to cut around the design.
By choosing the right shirt, you’ll set yourself up for success by cutting it into a tank top. Remember these tips when selecting your shirt, and you’ll be on your way to a fashionable new tank top in no time!
Measuring and Marking the Cut Lines
Once you’ve chosen your shirt, it’s time to measure and mark the cut lines. This step will help you ensure that your tank top is the right size and shape. Here’s how to do it:
- Lay your shirt flat and smooth out any wrinkles or bumps.
- Use a measuring tape to measure the desired length of your tank top. If you need to figure out how long you want your tank top to be, try measuring it against a tank top you already own.
- Once you’ve determined the length, use a fabric pen or chalk to mark the cut line at the bottom of the shirt. Be sure to make a straight line across the shirt.
- Next, it’s time to mark the cut lines for the sleeves. Use the measuring tape to measure the desired length of the sleeve opening, then mark it with your fabric pen or chalk. Be sure to make the lines on both sleeves symmetrical.
- Finally, it’s time to mark the neckline. Use your fabric pen or chalk to draw a curved line that starts inside the shoulder seam and ends at the center of the collar. It will create a scoop neck for your tank top.
Use a light touch with your fabric pen or chalk when marking the cut lines. You don’t want to leave any permanent marks on your shirt! And remember, if you need clarification on the length or shape of your tank top, you can always make small adjustments later.
Follow these simple tips, and you’ll be ready to move on to the next step.
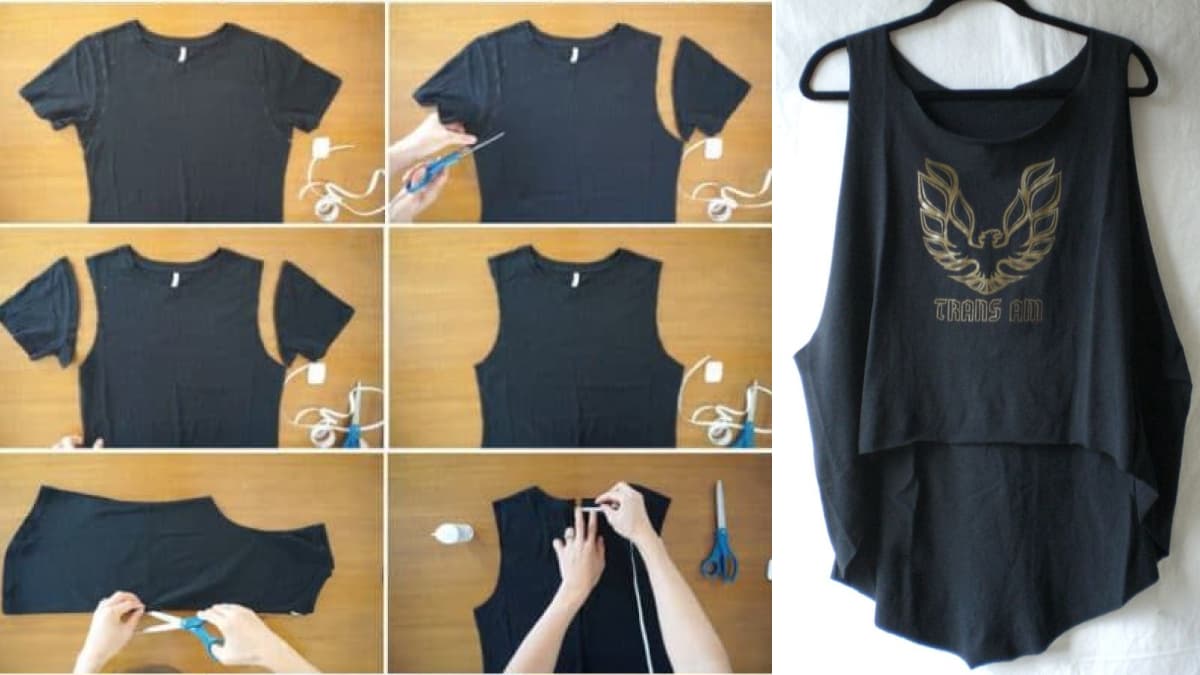
Cutting the Sleeves
Now that you’ve marked up your shirt, it’s time to cut off those sleeves! This step is essential for transforming your shirt into a tank top. Here’s how to do it:
- Start by folding your shirt in half vertically, with the front of the shirt facing you.
- Use your fabric scissors to cut along the marked lines for the sleeve openings. Cut carefully and smoothly, following the lines you marked earlier. Make sure you’re cutting through both layers of fabric.
- Once you’ve cut both sleeves, your shirt should start to look like a tank top! However, the edges of the armholes are still rough.
- To smooth out the edges, use your fabric scissors to trim any excess fabric from the edges of the armholes. That will help to make them neat.
- Finally, it’s a good idea to try on your tank top and make any necessary adjustments. You can always trim the edges a bit more or make small alterations to the length or shape of the shirt.
And that’s it! You’ve successfully cut the sleeves off your shirt and turned it into a tank top.
Cutting the Neckline
Cutting the neckline is important in turning your shirt into a tank top. Here are the steps to follow:
- Flip your shirt over so that the back is facing you.
- Use a fabric marker to draw a curved line where you want the neckline to be. The line should start just above the shoulder seam on one side and end just above the shoulder seam on the other.
- Use fabric scissors to cut along the curved line carefully. Make sure to cut through both layers of fabric.
- Try on your tank top and check the neckline. If you want it to be deeper, make small cuts to the fabric until you’re happy with the shape.
- If you want a cleaner finish, you can fold the edge of the neckline under and sew it in place using a needle and thread or a sewing machine. This step is optional but can give your tank top a more polished look.
With these simple steps, you’ve successfully cut the neckline of your shirt and transformed it into a stylish tank top.
Finishing Touches
Now that you’ve created your tank top, you can add some finishing touches to make it even more unique. Here are some optional steps you can take:
Adding Fringe
To add fringe to your tank top, use fabric scissors to make small cuts along the bottom edge of the shirt. The cuts should be about an inch apart and only go up to where you want the fringe to start. Once you’ve made the cuts, gently pull on the fabric to create a fringed effect.
Distressing the Edges
To distress the edges of your tank top, use fabric scissors to cut small slits or notches in the edges of the fabric. You can also use sandpaper or a pumice stone to rough the edges for a more distressed look.
Bleaching or Dyeing
If you want to give your tank top a new color, you can bleach or dye it. To bleach, mix bleach and water in a spray bottle and spray the shirt. Let it sit for a few minutes, then rinse it off. To dye, follow the instructions on the dye package and dye the shirt in a container or sink.
Remember, these steps are optional; you can do them if you want to. But they can add some fun and creativity to your new tank top!
Conclusion
Transforming an old shirt into a trendy tank top is a fun and easy DIY project that can save you money while adding creativity to your wardrobe. Following the step-by-step instructions outlined in this article, you can breathe new life into a shirt that would otherwise go unused.
Remember to choose the right shirt, measure and mark the cut lines carefully, and follow the steps for cutting the sleeves and neckline. Adding finishing touches such as fringe or distressing edges can add some flair to your creation.
Cutting a shirt into a tank top is an opportunity to express your style and creativity while reducing waste and giving new life to an old garment.
In conclusion, with a little time, effort, and creativity, you can transform an old shirt into a stylish tank top that reflects your personal taste and fashion sense.
Most Viewed Articles
- 20 Different Styles of Vests You Need to Try
- 11 Different Types of Earring Closures for a Secure Fit
- 28 Types of Shorts for Women to Revamp Your Wardrobe!
- 18 Different Types of Sweatpants to Up Your Loungewear Game
Resources
Pinterest
The images used in this post belong to their respective site owners. The credits for the available images are specified under each image. If you own an image and would like it to be removed, please get in touch with us.